通过 Vue 组件实现单页面应用无跳转登录
我们在上一篇教程中通过是否需要登录访问重新组织了后端路由,并且移除了之前依赖后端 + 视图实现的登录方式,在这一篇教程中,我们将通过 Vue 组件 + 后端 API 实现在单页面应用中的无跳转登录。
第一步:前端默认重定向到首页
我们首先在 resources/assets/js/routes.js 中通过 redirect 属性将前端路由 / 重定向到首页页面 home,这样,layout 将不再单独会出现在视图中:
routes: [
    {
        path: '/',
        redirect: {name: 'home'},
        name: 'layout',
        component: Vue.component('Home', require('./pages/Layout.vue')),
        ...
第二步:为用户登录创建模态框组件
由于我们在上一篇教程中已经移除了登录视图,所以需要为用户登录创建一个新的 Vue 组件 LoginModal.vue,我们将其存放到 resources/assets/js/components/global 目录下,初始化组件代码如下:
<style lang="scss">

</style>

<template>

</template>

<script>
  import { EventBus } from '../../event-bus.js';

  export default {

  }
</script>
至此,应用的所有页面视图都收敛到了单页面应用中。我们编写组件模板代码如下:
<template>
    <div id="login-modal" v-show="show" v-on:click="show = false">
        <div class="login-box">
            <a href="/auth/github" v-on:click.stop="">
                <img src="/storage/img/github-login.jpg"/>
            </a>
        </div>
    </div>
</template>
登录链接还是 auth/google,模板中的代码完全可以从之前的 login.blade.php 中拷贝过来,放到 div.login-box 元素中。需要注意的是我们为每个登录链接元素定义了一个 v-on:click.stop="" 属性,用于阻止点击事件冒泡,因为 login-modal 会在用户点击后关闭,我们不想在点击登录链接时触发其关闭。
接下来,我们来编写脚本代码,我们会在组件 mounted 中监听全局 prompt-login 事件,如果监听该事件被触发,比如用户点击了登录按钮,则显示 login-modal 模态框,否则不显示,是否显示模态框通过 show 模型数据来控制。
<script>
    import {EventBus} from '../../event-bus.js';

    export default {
        data() {
            return {
                show: false
            }
        },

        mounted() {
            EventBus.$on('prompt-login', function () {
                this.show = true;
            }.bind(this));
        }
    }
</script>
最后,我们为登录模态框组件编写样式代码,如果你之前为 login.blade.php 定义了样式代码可以直接拷过来:
<style lang="scss">
    div#login-modal {
        position: fixed;
        top: 0;
        bottom: 0;
        left: 0;
        right: 0;
        background-color: rgba(0, 0, 0, .6);

        div.login-box {
            max-width: 370px;
            min-width: 320px;
            padding: 0 10px;
            background-color: #fff;
            border: 1px solid #ddd;
            -webkit-box-shadow: 0 1px 3px rgba(50, 50, 50, 0.08);
            box-shadow: 0 1px 3px rgba(50, 50, 50, 0.08);
            -webkit-border-radius: 4px;
            border-radius: 4px;
            font-size: 16px;
            position: absolute;
            top: 50%;
            left: 50%;
            transform: translate(-50%, -50%);

            a {
                display: block;
                margin: auto;
                width: 230px;
                margin-top: 10px;
                margin-bottom: 10px;
            }
        }
    }
</style>
第三步:引入 LoginModal.vue
定义好登录模态框组件后,需要在 resources/assets/js/pages/Layout.vue 中引入,以便可以全局使用:
import LoginModal from '../components/global/LoginModal.vue';在 components 组件中添加这个组件:
components: {
    Navigation,
    LoginModal
},
然后在 template 模板中紧随 router-view 组件引入 login-modal 组件,这样,和导航组件一样,在所有页面中都会包含登录模态框了:
<template>
    <div id="app-layout">
        <navigation></navigation>
        <router-view></router-view>
        <login-modal></login-modal>
    </div>
</template>
最后,我们还要在 Navigation.vue 组件的模板中显示登录/退出链接及用户头像:
<div class="right">
    <img class="avatar" v-if="user != '' && userLoadStatus === 2" :src="user.avatar" v-show="userLoadStatus === 2"/>
    <span class="logout" v-if="user != '' && userLoadStatus === 2" v-on:click="logout()">退出</span>
    <span class="login" v-if="user == ''" v-on:click="login()">登录</span>
</div>
如果用户未登录则显示登录链接,否则显示用户头像和退出链接。当然,我们需要在脚本代码中引入事件总线:
import {EventBus} from '../../event-bus.js';然后在 methods 中编写 login() 方法,当用户点击登录链接时会执行该方法触发 prompt-login 事件,登录模态框组件监听到该事件后会在页面中显示登录模态框以便用户点击登录:
login() {
    EventBus.$emit('prompt-login');
},
以及 logout() 方法用于响应用户点击退出链接,用户退出时会先调用 logoutUser 动作清除 Vuex 中的用户状态数据然后页面跳转到 logout 退出登录状态:
logout() {
    this.$store.dispatch('logoutUser');
    window.location = '/logout';
}
这样,我们就已经实现了基于 Vue 组件实现用户无跳转登录的完整功能链路。接下来,我们对之前提供的一些需要登录后显示的按钮/链接进行调整,以便优化用户体验。
第四步:调整需要登录后显示的视图组件
首先是应用首页 Home.vue,在页面顶部有一个新增咖啡店按钮,需要将其调整为登录后显示,如果未登录则提示用户登录后添加:
<div class="large-12 medium-12 small-12 columns">
    <router-link :to="{ name: 'newcafe' }" v-if="user !== '' && userLoadStatus === 2" class="add-cafe-button">
        + 新增咖啡店
    </router-link>
    <a class="add-cafe-text" v-if="user === '' && userLoadStatus === 2" v-on:click="login()">登录后添加咖啡店</a>
</div>
然后是咖啡店详情页 Cafe.vue,页面中有一个喜欢/取消喜欢链接,我们也将其调整为登录后显示,否则提示用户登录后操作:
<div class="like-container">
    <div class="grid-x">
        <div class="large-12 medium-12 small-12 cell">
            <toggle-like v-if="user !== '' && userLoadStatus === 2"></toggle-like>
            <a class="prompt-log-in" v-if="user === '' && userLoadStatus === 2" v-on:click="login()">登录后喜欢该咖啡店</a>
        </div>
    </div>
</div>
另外,在上面两个页面中都要引入事件总线:
import {EventBus} from '../event-bus.js';并且在 methods 中编写 login() 方法,和 Navigation.vue 组件中的实现思路一致:
methods: {
  login() {
      EventBus.$emit('prompt-login');
  },
}
此外,在上面两个页面组件中,还要确保在计算属性 computed 中包含 user 和 userLoadStatus 的获取方法,否则编译后访问页面会报错:
// 从 Vuex 中获取用户加载状态
userLoadStatus() {
return this.$store.getters.getUserLoadStatus;
},
// 从 Vuex 中获取用户信息
user() {
return this.$store.getters.getUser;
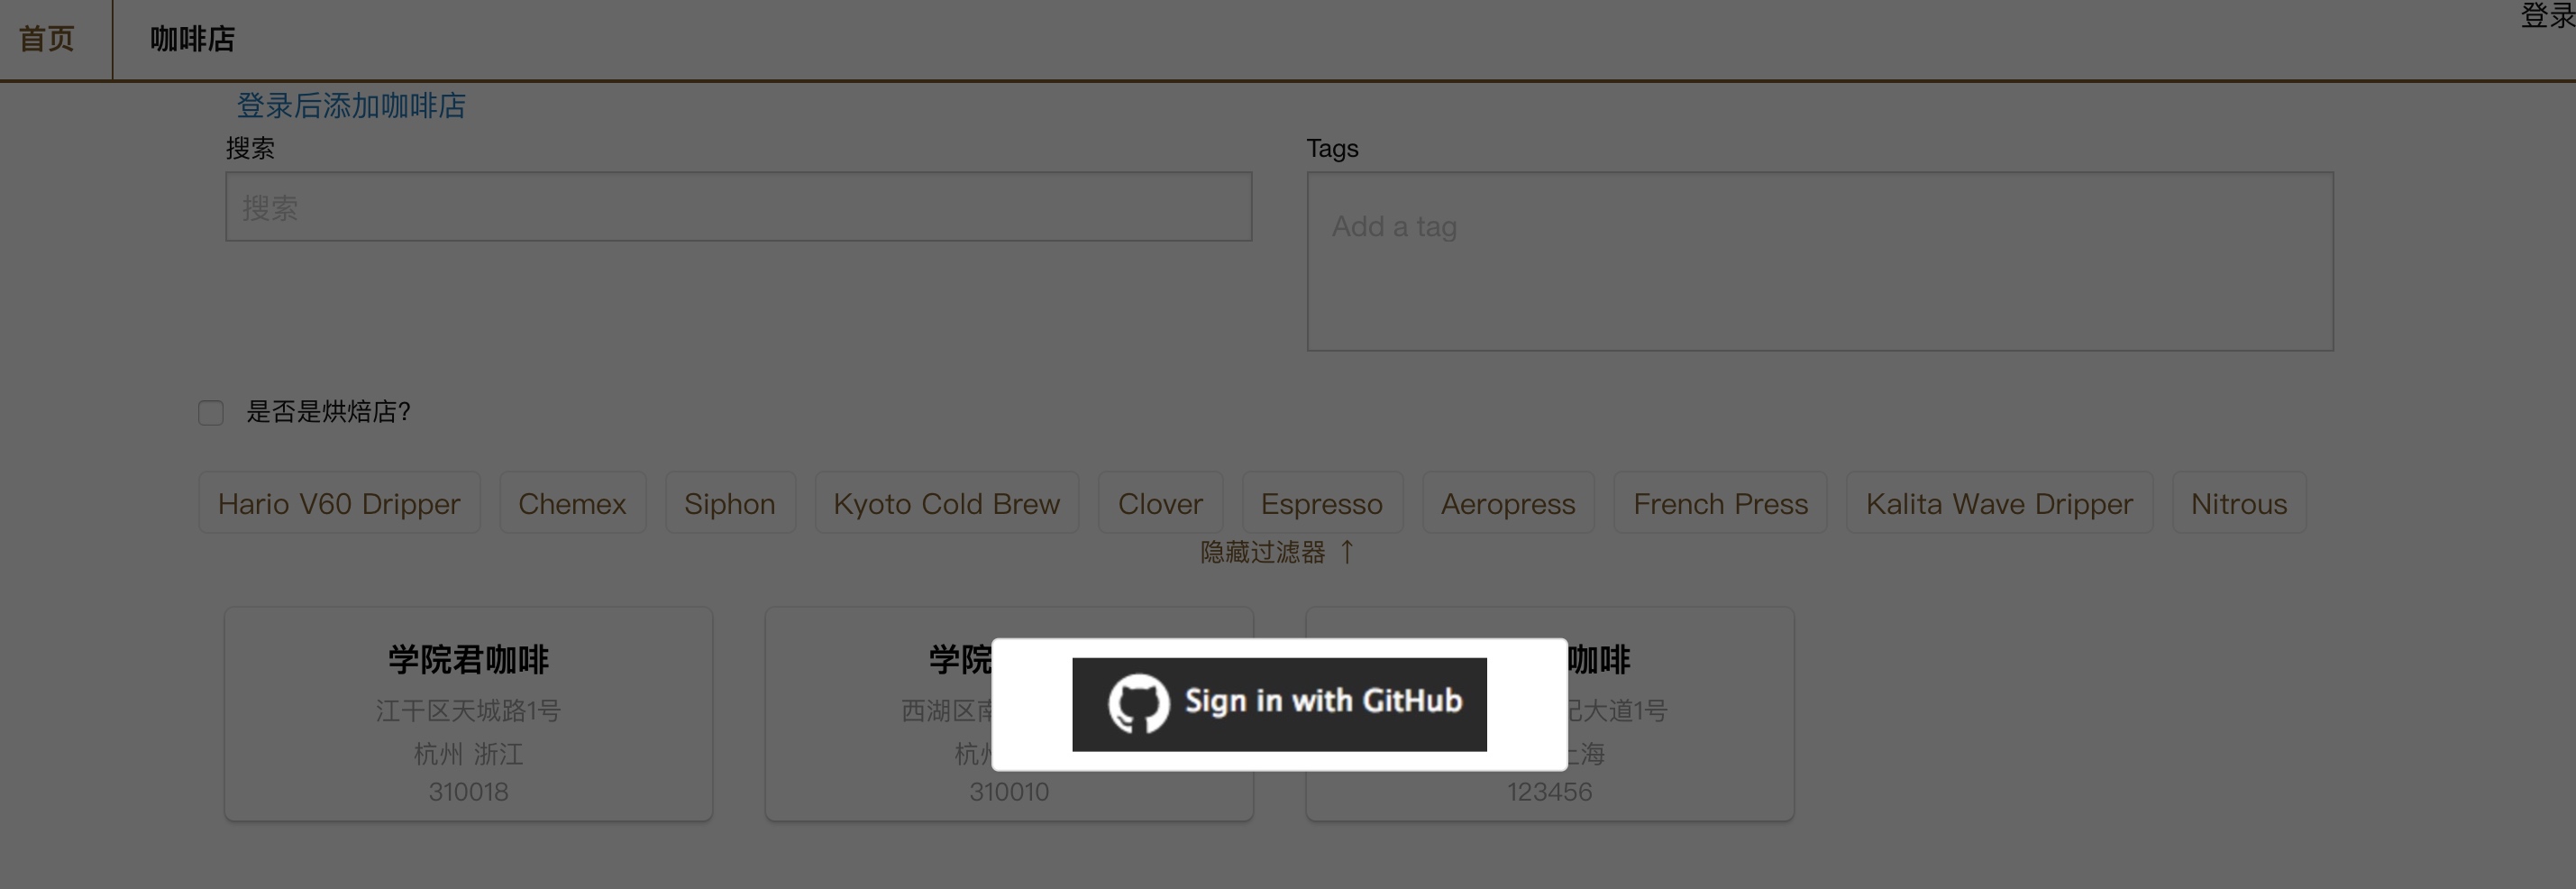
},这样,我们就已经完成了通过 Vue 组件实现用户登录功能的所有代码编写,运行 npm run dev 重新编译前端资源,访问 http://roast.test,页面会跳转到 http://roast.test/#/home,并显示相应的登录链接,点击登录链接,会弹出登录模态框:
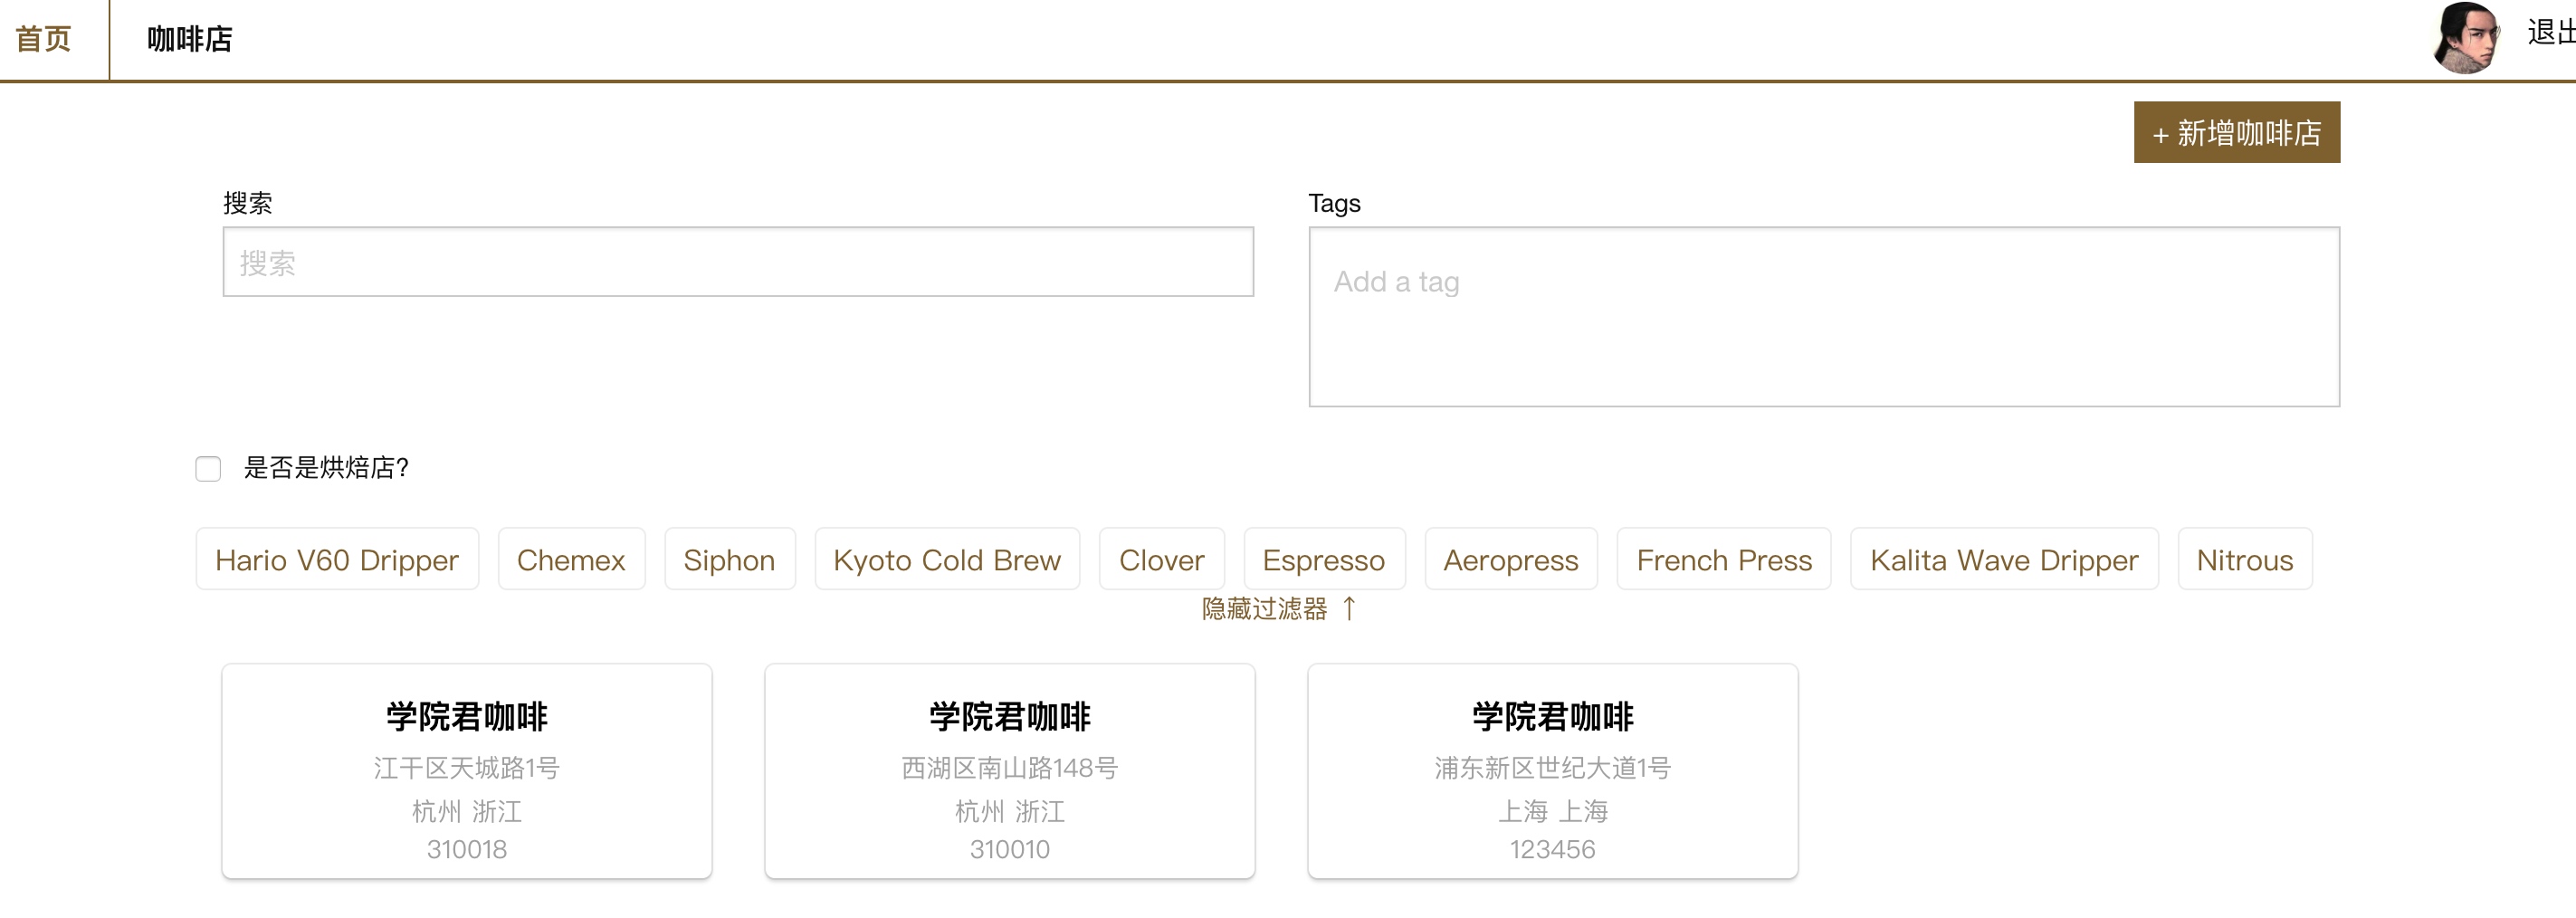
点击登录按钮,页面会刷新并显示为登录状态:
7 条评论
跟着代码到这里,发现没有
this.$stoer.getters.getUser/getUserLoadStatus, 相应的也没有../api/user.js, ../modules/users.js等文件 所以,user数据是我们的线下作业咯?主动式学习 很好
我跟着学院君撸代码,也放上gayhub了:
https://github.com/Totn/Roast我套用了 源码 但是 还是有问题!!!
确实 User 部分需要自己完善
退出了 为嘛还跳转到
/logout??请问一下如何配置webpack热更新?