Vue 组件插槽:父子组件间的内容分发和插槽作用域
插槽的作用
在组件入门这篇教程中,学院君已经给大家演示了插槽(slot)功能的基本使用,插槽的主要作用就是在组件中分发父作用域的内容,这个父作用域可以是 Vue 全局容器(可以看作是一个全局的「根组件」),也可以是父组件。
说到这里,我们可以引用一张 Vue 官网提供的组件架构图,实际上,一个 Vue.js 应用就是基于下面这样的一个组件树来组织和管理页面元素的:
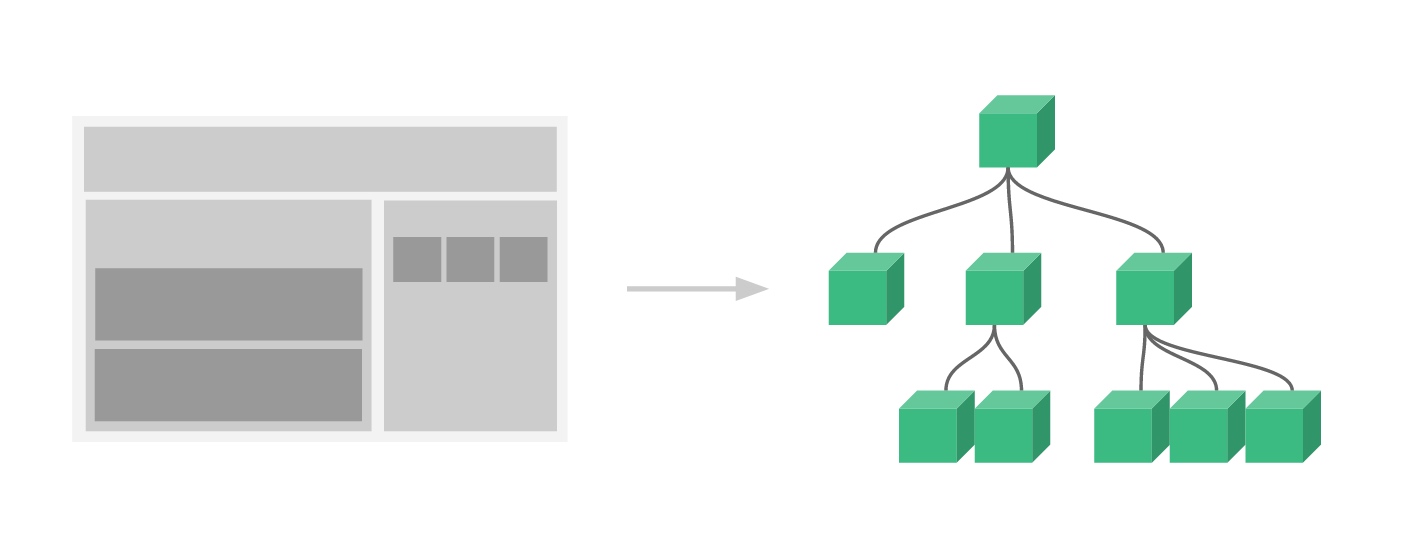
我们可以把全局 Vue 实例看作一个最顶层的隐式组件,其他组件都是通过 Vue.component 在此基础上注册,并且这些组件之间可以相互嵌套、内容分发、数据传递以及事件通知来建立联系,从而通过一个个小组件自下而上层层叠加,最终构建出复杂的页面布局和功能模块。
关于组件嵌套、数据传递和事件通知学院君前面都已经介绍过了,回到插槽这个主题,我们可以通过 <slot></slot> 语法在子组件中渲染父级作用域定义的元素,从而实现嵌套组件之间的内容分发。
命名插槽
单个插槽在组件入门中已经演示过,如果组件中定义了多个插槽,则可以通过命名插槽的方式来实现内容分发,为了演示这个功能,我们在 vue_learning/component 目录下新建一个 slot.html 文档,并编写示例代码如下:
<!DOCTYPE html>
<html>
<head>
<meta charset="UTF-8">
<title>插槽及其作用域使用示例</title>
<link rel="stylesheet" href="https://stackpath.bootstrapcdn.com/bootstrap/4.5.2/css/bootstrap.min.css" integrity="sha384-JcKb8q3iqJ61gNV9KGb8thSsNjpSL0n8PARn9HuZOnIxN0hoP+VmmDGMN5t9UJ0Z" crossorigin="anonymous">
<script src="https://code.jquery.com/jquery-3.5.1.slim.min.js" integrity="sha384-DfXdz2htPH0lsSSs5nCTpuj/zy4C+OGpamoFVy38MVBnE+IbbVYUew+OrCXaRkfj" crossorigin="anonymous"></script>
<script src="https://stackpath.bootstrapcdn.com/bootstrap/4.5.2/js/bootstrap.min.js" integrity="sha384-B4gt1jrGC7Jh4AgTPSdUtOBvfO8shuf57BaghqFfPlYxofvL8/KUEfYiJOMMV+rV" crossorigin="anonymous"></script>
<script src="https://cdn.jsdelivr.net/npm/vue@2.5.21/dist/vue.js"></script>
</head>
<body>
<div id="app">
<!-- Button trigger modal -->
<button type="button" class="btn btn-primary" data-toggle="modal" data-target="#exampleModal">
模态框
</button>
<!-- Modal -->
<modal-example>
    <template slot="header">标题</template>
    主体内容...
</modal-example>
</div>
<script>
Vue.component('modal-example', {
template: '<div class="modal fade" id="exampleModal" tabindex="-1" aria-labelledby="exampleModalLabel" aria-hidden="true">' +
' <div class="modal-dialog">' +
' <div class="modal-content">' +
' <div class="modal-header">' +
' <h5 class="modal-title" id="exampleModalLabel"><slot name="header"></slot></h5>' +
' <button type="button" class="close" data-dismiss="modal" aria-label="Close">' +
' <span aria-hidden="true">×</span>' +
' </button>' +
' </div>' +
' <div class="modal-body">' +
' <slot></slot>' +
' </div>' +
' <div class="modal-footer">' +
' <button type="button" class="btn btn-secondary" data-dismiss="modal">Close</button>' +
' <button type="button" class="btn btn-primary">Save changes</button>' +
' </div>' +
' </div>' +
' </div>' +
'</div>'
});
new Vue({
el: '#app'
})
</script>
</body>
</html>
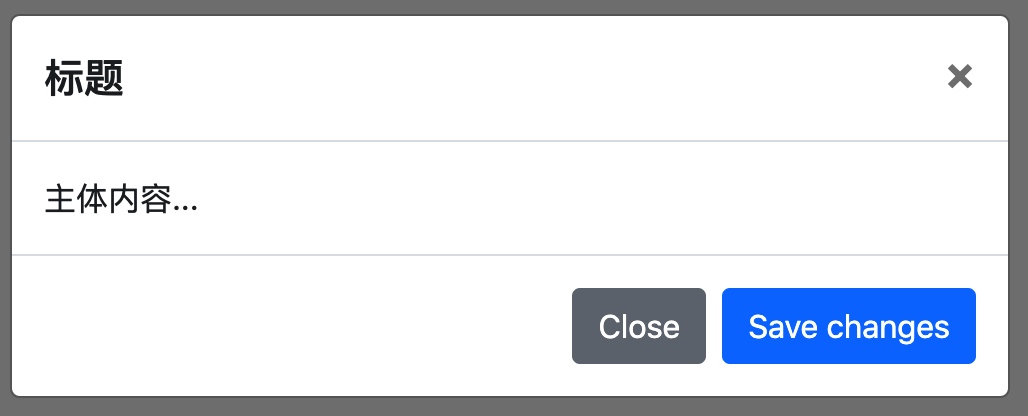
在这段代码中,我们引入了 Bootstrap 框架来渲染一个模态框,具体的模态框部分代码通过 modal-example 组件来定义,在这个组件中,我们定义了两个插槽来分发父级作用域分发的内容,一个用于渲染模态框标题,一个用于渲染模态框主体内容:
<div class="modal-header">
<h5 class="modal-title" id="exampleModalLabel">
<slot name="header"></slot>
</h5>
<button type="button" class="close" data-dismiss="modal" aria-label="Close">
<span aria-hidden="true">×</span>
</button>
</div>
<div class="modal-body">
<slot></slot>
</div>
对应的父级作用域中,我们通过如下代码引入 modal-example 组件进行渲染:
<modal-example>
<template slot="header">标题</template>
主体内容...
</modal-example>
可以看到,对于组件中的命名插槽,需要通过 <template slot="name">...</template> 与之呼应,其中 name 值就是命名插槽对应的 name 属性值:
<slot name="header"></slot>
这样 <template></template> 标签中对应的内容就会分发到对应命名插槽中,而 <modal-example></modal-example> 标签中定义其他的内容则会自动分发到未命名的插槽中:
<slot></slot>
我们在浏览器中预览这个 HTML 文档,就可以看到对应的渲染效果了:
当然,你也可以定义多个命名插槽:
# 视图部分
<modal-example>
    <template slot="header">标题</template>
    <template slot="body">主体内容...</template>
</modal-example>

...

# 组件模板
<div class="modal-header">
    <h5 class="modal-title" id="exampleModalLabel">
        <slot name="header"></slot>
    </h5>
    ...
</div>
<div class="modal-body">
    <slot name="body"></slot>
</div>
效果也是完全一样的。
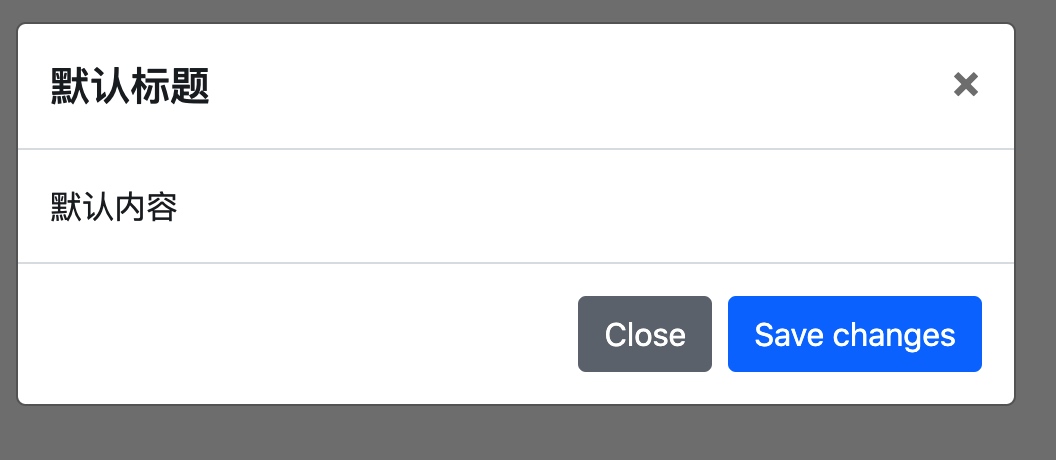
默认内容
Vue 还支持为插槽定义默认渲染内容,这样,即便父级作用域没有定义要分发的内容,也可以通过默认的内容进行渲染(如果父级作用域定义了要分发的内容,则会覆盖插槽中的默认内容):
# 视图部分
<modal-example>

</modal-example>

...

# 组件模板
<div class="modal-header">
    <h5 class="modal-title" id="exampleModalLabel">
        <slot name="header">默认标题</slot>
    </h5>
    ...
</div>
<div class="modal-body">
    <slot name="body">默认内容</slot>
</div>
对应的渲染效果如下:
作用域
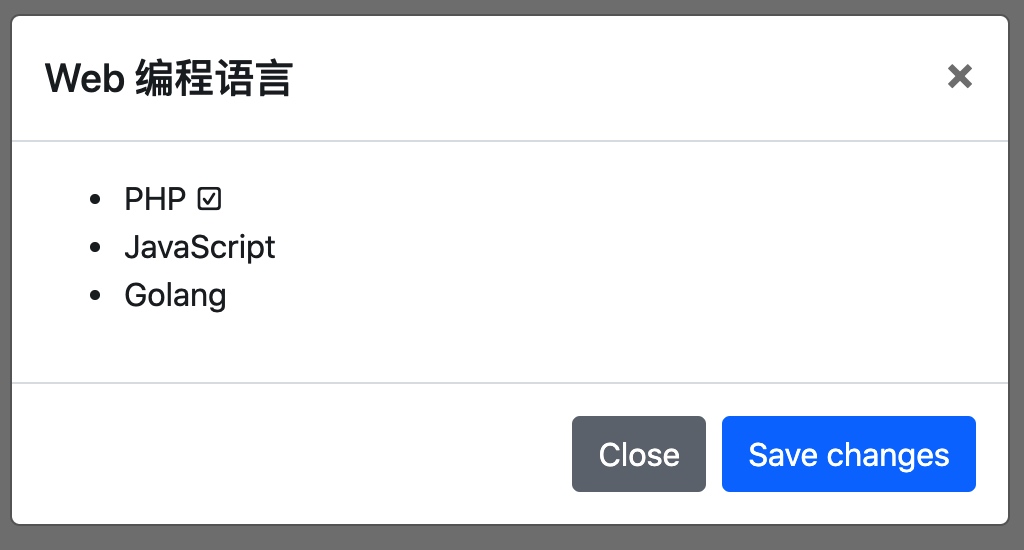
以上内容分发都是静态的内容渲染,除此之外,我们还可以在父级作用域获取组件插槽中的动态数据,从而通过条件过滤实现内容的动态渲染,你可以将其理解为在父级作用域引用带有动态数据的插槽,那如何在父级作用域中调用组件插槽中的数据呢?Vue.js 框架通过作用域插槽的机制对此提供了支持。
# HTML 视图
<modal-example :languages="['PHP', 'JavaScript', 'Golang']">
<template slot="header">Web 编程语言</template>
<template scope="slotProps">
{{ slotProps.language }}
<span v-if="slotProps.language == 'PHP'">☑️</span>
</template>
</modal-example>
...
# 组件模板
Vue.component('modal-example', {
props: ['languages'],
template: ... +
'<div class="modal-header">' +
' <h5 class="modal-title" id="exampleModalLabel"><slot name="header"></slot></h5>' +
' <button type="button" class="close" data-dismiss="modal" aria-label="Close">' +
' <span aria-hidden="true">×</span>\n' +
' </button>' +
'</div>' +
'<div class="modal-body">' +
' <ul><li v-for="language in languages"><slot v-bind:language="language">{{ language }}</slot></li></ul>' +
'</div>' +
...
});
重点关注主体内容对应的插槽,我们在父级作用域引用 modal-example 组件时,通过 props 属性 languages 传入了要渲染的数据,然后在组件模板对应的插槽中,通过如下代码渲染传入的数据:
<div class="modal-body">
    <ul>
        <li v-for="language in languages">
            <slot v-bind:language="language">{{ language }}</slot>
        </li>
    </ul>
</div>
我们通过一个循环列表渲染从父级作用域传入的 languages 数据,将每一个列表项通过插槽转发给父级作用域定义渲染的内容(这里指定了默认的内容,即 {{ language }},如果父级作用域中没有定义分发的内容,则使用默认内容渲染),另外,我们还在 slot 标签上绑定了一个动态属性 :language,这一步不可或缺,有了这个绑定才可以在父级作用域引用插槽中的变量数据。
我们来看父级作用域中分发内容到该插槽的示例代码:
<template scope="slotProps">
    {{ slotProps.language }}
    <span v-if="slotProps.language == 'PHP'">☑️</span>
</template>
这里,需要通过一个未命名的 template 元素来包裹待分发内容,然后在这个元素上设置 scope 属性,声明对应的插槽作用域为 slotProps,即主体内容部分对应的插槽(只能访问该插槽绑定的数据),这样一来,就可以通过 slotProps.language 访问绑定到该插槽上的 language 变量数据了(当然,你还可以在插槽上绑定更多属性,然后通过 slotProps 在父级作用域引用它们)。
在浏览器中预览这个模态框,渲染效果如下:
以上就是 Vue.js 组件插槽的基本功能和使用演示。
到目前为止,我们所有的 Vue 组件都是在单个 HTML 文档中定义的,如果组件很多、模板代码很复杂,将会导致代码可读性和可维护性很差,这里一个小小的模态框演示代码足以窥见端倪。为此,Vue.js 生态提供了 Vue Loader 来支持编写单文件 Vue 组件,从而方便我们以更加灵活、更加现代的方式构建功能强大的 Vue 应用,下篇教程,学院君将给大家演示如何 Vue CLI + Vue Loader 来编写单文件 Vue 组件,并成功在 HTML 文档中引入和渲染。
1 条评论
感觉更新的好乱,内容确实挺多,但是很乱,如果能有个 vue 专区就更好了